When it comes to dried beans, many questions abound. Do I need to soak them? Won't salt harden beans during cooking? Are beans toxic? And if you do a simple search on the internet, there's a lot of differing opinions that would lead you down any one path. And so, I've written up how I work with dried beans in the hope of removing some of the confusion and concern that comes with working with dried beans.
I'll admit, this can feel overwhelming, but I'm giving you information to remove the mystery. If you want to know exactly how I cook my beans, you can scroll past to the actual recipe. However, I think it's helpful to know all the ins and outs before diving in because there are a few factors and endless amounts of variations!
---------------------------
I don't knock canned beans. They are relatively cheap, easy to work with, and can help get a fast, nice meal to the table. I usually keep a can or two on hand for quick meals as I need them. However, cooking dried beans does have benefits.
For starters, let's think about beans for what they are: seeds. Theoretically, if you planted a bean in the ground, you'd have a bean plant (I say theoretically because store beans are often too old and/or irradiated). At any rate, a bean is not just a bean. It’s a plant and each bean variety is unique, like every other kind of plant.
There are many varieties of beans, each with a distinctive texture, flavor, and cooking profile. Some beans hold their shape and have a noticeable texture after cooking. Other beans fade away and become secondary. Using dried beans allows you to experiment with this all in ways canned beans just can't.
Also, dried beans are usually a bit cheaper and low-to-zero waste if you can buy them from a bulk bin. Many local farmers also grow beans, which means you can source fresh, locally grown dried beans as well.
---------------------------
Short answer: yes. Beans contain varying levels of a toxic lectin called phytohaemagglutinin (PHA). This lectin is highest in kidney and cannellini beans but found in all beans. Studies say, even eating as many as few raw kidney beans can cause food poisoning.
It's not something to fear, though! There's a simple way to reduce the lectin: give the beans a good boil. The average advice is 10 minutes, but I like to boil all my beans for 15 minutes before dropping the cooking temperature, just to be sure.
---------------------------
I make about two batches of beans a week, and they all start with a quick rinse. While most store-bought beans are processed and cleaned well, there's a possibility for a bit of dust, dirt, or even debris (I've found a couple of rocks in beans before). I rinse and just do a quick check over the beans. No, it's not necessary, but I like to be proactive and to rinse the beans doesn't take much time at all.
---------------------------
If ever you want to go down a rabbit hole of varied information, look up soaking beans. Articles titles include things like "always soak your beans," and others read, "soaking beans is overrated." It can be confusing.
So I'll make this simple, and then I'll explain why. Yes, you can cook your beans without soaking, but there are benefits, just not the ones you've probably heard before. I always soak my beans.
Soaking + Oligosaccharides
I'll start with the most contentious one with the preface that I am neither a scientist nor a nutritionist. Oligosaccharides are indigestible sugars that are directly linked to causing gas when eating beans. Soaking beans removes some of these sugars. However, papers I've read span the spectrum on how long to soak and how many sugars soaking removes. And so, soaking based on this alone is not very persuasive.
I think it's also important to note that in the path of traditional foods, beans are taken through a process of soaks/changing water to help unlock all the nutrients the beans have to offer. I think this article on Weston Price is worth a read if you want to go down the bean path.
Soaking + Bean Cooking
The real reason I soak beans is to increase my chances of even cooking. Soaking is especially crucial if you're cooking older beans. Old beans are a bit erratic. Sometimes they cook fine, but other times they don't cook at all. And unless you're buying beans straight from a farmer, it can be hard to know just how old your beans are.
I soak overnight, up to 24 hours in cool water. There's no increased benefit, that I can find, to soak for 24 hours. It's just sometimes that is how my schedule works. I find at least 8 hours is a solid amount but that’s not a hard rule.
Soaking + Salt
Adding salt to my soaking liquid is a newer addition to my bean workflow. It seems counterintuitive given how much information is out there about salt causing hard beans. However, soaking in salt helps soften the skins of the beans which allows the beans to expand easily during cooking.
For every 1 cup of dried beans (roughly 6 ounces), I soak, I use about 3 cups of water and 2 teaspoons kosher salt or 1 teaspoon fine sea salt.
Soaking + Baking Soda
Many hummus recipes call for soaking the garbanzo beans in a baking soda solution. The baking soda reacts with the beans, helping them greatly soften. Adding baking soda is great if you're planning to make silky smooth hummus, not so great if you want whole beans. I only use baking soda if I know I'm making a spread or dip and I’ve only really used this trick with garbanzo beans.
Quick Soaking
Of course, soaking overnight is inconvenient if you remember the day-off wanting to have beans. When I remember, I started soaking beans, hopefully, for at least three hours before I plan to cook.
If I still forget, I'll do a quick soak. A quick soak is done by bringing beans and water to a boil for one minute, turning off the heat, covering the pot, and soaking for one hour. Drain and continue with the recipe.
Sprouting Beans
A note about sprouted beans since they are an extension of soaking beans: as with soaking, sprouting beans helps unlock more nutrients our bodies can absorb. If you think about it, it makes sense as the bean seed is turning into a plant. However, cooking sprouted beans is important because of the toxins mentioned above. Here's a brief overview of sprouting beans.
---------------------------
Whether or not to keep the soaking liquid is another decision to make. Many people feel that when you toss the soaking liquid, you toss flavor and nutrients away. As this study states, no major loss of nutrients happens when you discard the soaking liquid. As for flavor, I prefer to shape the beans my way through aromatics in the cooking broth.
And so, I drain my beans and add them to the cooking pot with fresh water. I do not, however, rinse the beans again. If you’re trying to really reduce the sugars, you could rinse but I’ve never noticed a huge difference in this extra step.
---------------------------
Once you get past the initial bean processing, the fun part happens. I love cooking a pot of beans on the stovetop. The fragrance, the sound, and the warmth are all things I enjoy through the bean cooking process. It's a routine I love. I could write a whole post just on this section, but I'm going to give a brief overview of things to consider.
Liquid Amounts
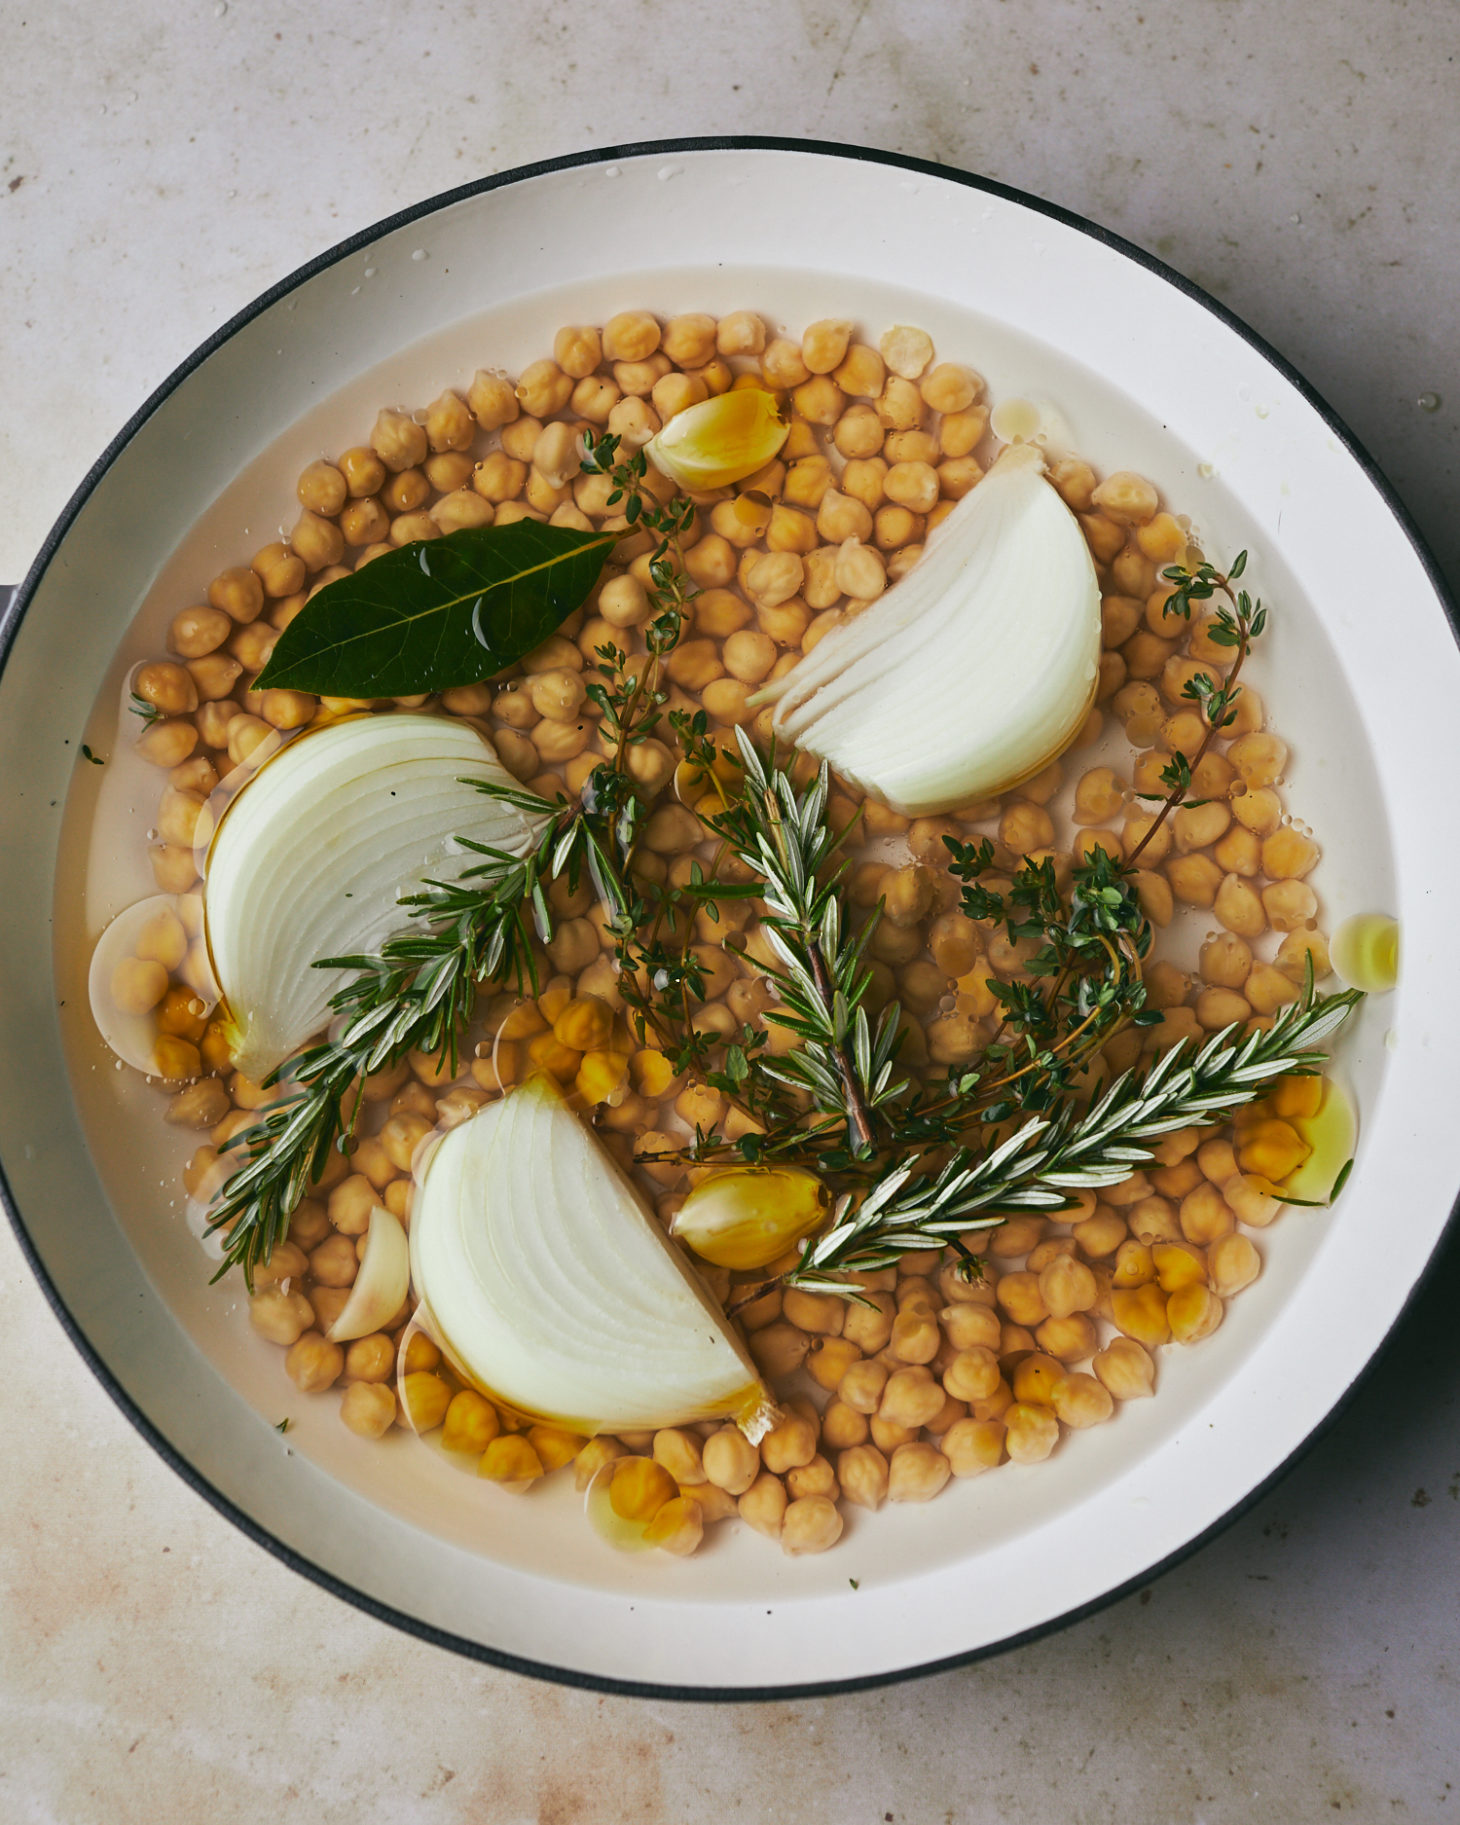
Once I've drained my beans of their soaking liquid, I place them in a pot and add enough water to cover the beans with about 2" of cool water above the bean level. The beans will absorb a sizable amount of water, and the liquid will cook-off as well.
If you find that as your beans are cooking, the liquid stops covering all the beans, add hot water. Adding cool water will cause a cooking interruption. I heat water in a tea kettle.
Cooking: Boil? Simmer? Both?
I cook beans the same way, every time. I bring the beans to a boil with the aromatics and salt. I let the beans boil for 15 minutes (see the section about toxins), and then I reduce the heat to as low as it can go to still ensure a bit of movement in the broth. The liquid should barely be simmering. This method slowly cooks the beans to keep each bean intact and evenly cooked.
Also, I always cook my beans with the lid off. The flavor is so much better as the liquid concentrates, like in making any kind of broth. Lids do decrease cooking time, but I'd rather have more flavorful beans.
Aromatics
The biggest thing you can do for your beans is act as though you're making a broth. Anything you add can bring flavor to your beans- an advantage cooking dried beans has over buying canned.
On average, I use ½ large onion, a few cloves of garlic, a few sprigs of hard herbs, one bay leaf, and a drizzle of olive oil for every 1 cup of dried beans I'm cooking. I'll swap out spices and other herbs as desired for the type of beans I'm cooking.
I usually just toss in the aromatics, lose in the pot, and remove the best I can at the end of cooking. If you want a cleaner bean broth, wrap the aromatics in cheesecloth and add that way.
Salt
As mentioned above, salt tends to get a bad rap when it comes to cooking beans, and to be honest, I was skeptical about salt in cooking beans for awhile. It's a myth that salt creates tough beans. I've found that when my beans aren't cooking well, I'm either being impatient or using old beans. Salt those beans at the start of cooking!
The Finishers: Acid/Dried Chiles/Soft herbs
Potential Oligosaccharide reducers
Different cultures have different methods for making beans soft and digestible. Epazote, kombu, and asafoetida are options. Items such as cumin and fennel are said to help as well. I've never really experimented much with any of these but wanted to make it known just in case you wanted to go off and research on your own.
Skimming
Often recipes call for skimming off the foam that forms on top of the beans while cooking. Skimming isn't a must; the foam isn't bad. Skimming does help keep the bean liquid clean and your beans within sight. If a lot of foam builds up, I skim. If it's just a little, I leave it be.
Other Cooking Methods
I can’t pretend to give you the best advice on these other ways of cooking- I'm a stovetop kind of person. However, there's quite a bit of information on the internet, and the links below are from people I trust.
Slow Cooker: One thing to consider when using the slow cooker is making sure your beans go through a boil for a bit, whether that's on the stovetop or in the crockpot. The linked article does mention this but I wanted to call it out as well.
The Instant Pot: This machine is great for quick beans but not so great for bean texture. One of the reasons I like stovetop cooking is because I can do the low simmer required for keeping beans intact. But, the instant pot does get hot enough to cook down the lectins, so boiling ahead of time is not a worry.
Oven-Baked Beans: My only addendum to Heidi's recipe would be that I'd boil the beans before placing them in the oven. I'm probably overly cautious about lowering the toxins, but I like to be safe.
---------------------------
I'm not going to give you a chart for the exact cooking times. So much can change based on how old the beans are, how much you boil versus simmer, and how long you soaked your beans. It's time to get intuitive with your cooking.
Once you suspect your beans might be getting close, start tasting. Adequately cooked beans should be soft with no graininess or firmness. I recommend starting with a small batch and tasting all the way through so you can see how the beans change with cooking, even to the point of overcooking them! Beans will also firm up as they cool, so it's essential the beans are cooked. If you're in doubt, keep cooking and taste testing.
If your beans are still firm, spit out the bean and keep cooking, tasting every 10-15 minutes. If you notice your beans start to fall apart, they're overcooked. Overcooking doesn't hurt the bean; it just means if you had plans to use them in salads or grain bowls, they might not be as firm as you like. After a few times of cooking dried beans, you’ll start to find a rhythm.
There are two places within the cycle of soaking and cooking beans that can make or break keeping beans intact. Soaking your beans in salt will soften the exterior of the beans and give your beans a chance at cooking evenly. And then, cooking your beans over low heat after the initial boil. No aggressive cooking! Whole beans are easily achievable if you bake your beans in the oven as well. The low heat from the oven helps keep things even.
---------------------------
For starters, I always store my beans in their liquid. That liquid is delicious broth at this point in time and a lot of my recipes start with doing a second cooking of the beans in their liquid, like in these miso beans or these pinto beans. The bean liquid is always great for using in soups or pasta sauces. Plus, the beans get the added benefit of staying in all that flavor you just created.
Your first step in storing cooked beans is cooling them properly. Cooling beans is where food safety training comes in handy. If I'm just making a small batch of beans, I transfer the beans to a heat-safe container and let cool for two hours before putting them in the refrigerator. If I make a larger batch, I transfer to multiple containers, allowing the beans to cool quicker.
From there, I keep beans up to about a week in the refrigerator. Most people will say no more than five days, but I use my nose. If the beans smell fine, they are fine. If they smell funky, toss.
Freezing cooked beans
You can freeze beans, but the beans do change a bit in texture after being frozen and thawed. If you want to freeze, place the cooled beans in a freezer-safe container. Leave about 1" worth of headroom for expanding liquid. You could also freeze beans without their liquid by spreading the cooked beans out on a sheet tray, freezing, then transferring to a freezer-safe container.
Freezing without liquid is excellent if you plan to use the beans in chilis, stews, and curries. I don't leave them in for longer than three months though- it seems beans get easily freezer burnt in or out of their liquid.


Wow, that was a lot of information but definitely helpful to have direct and concise information. This inspired me to make beans this weekend. Thanks!
Intresting, quick note on storing beans, firstly I often cook beans at lunch for use at dinner and rather then letting them cool on the side for 2 hours simply run them under the cold tap for a minute and put straight in the fridge, this shouldn't be a problem should it? Secondly you don't mention whether you store your bean in water or not I always used to and now don't. Any thoughts on which is better?
Not a problem- the whole cooling process is just to make sure you're not in the danger zone for too long and since you're dropping the temperature evenly, I would think it would be fine.
And thanks for pointing that out about no mention of how I store the beans. Honestly, I always store them in their liquid because I often use the liquid as well (it's flavor!) and the beans benefit flavor-wise from staying in their liquid. Granted, I'm also making a pot of beans to use over a week's time span. If you're using the beans same-day for a specific dish, I might not worry about it.
Thank you for this succinct summary on beans. I am definitely bookmarking this.
During this period of staying at home, one of my pleasures has been to leave a pot of beans on the stove, something I couldn't do until the weekends previously when I worked at an office. Thank you for all the information and links, I have learned a few new tricks!
Great post, Erin. Thanks!
Erin! I love this post. I don’t cook beans at home nearly enough. This breakdown is great.
You've taken my bean game to a whole other level of deliciousness. Thank you so so much!
This is the best information that I have read in a very long time. Sincere thanks and best regards.
Just made dried beans not in an instant pot for the first time ever. My house smells amazing and they taste delicious!
Read this article for the list of aromatics but gained lots of other information as well. Thank you for taking the long way around and covering all the bases. I’m going to take a deep breath and go back to using salt. It was working just fine for me until I read not to in an article and, wouldn’t you know, my beans stayed hard. Didn’t consider that maybe they were old, so thanks for the insight. Here are some things I find helpful: On cooling the beans, I just put the whole pan or (stainless) bowl in a sink full of cold water for a quick cool without having to handle them more (also saves dishes). Then (since it’s usually a bowl because I use the IP pot-in-pot method), I simply cover it with a plate to store in the fridge. Whenever there is extra broth, I freeze I for a future soup; it has great flavor.
This is so incredibly helpful, thank you!